
Bellsouth Poultry Equipment Poultry Information Learning Resource Sheets Egg Candling and Egg Testing for Egg Incubation
Candling

Candling
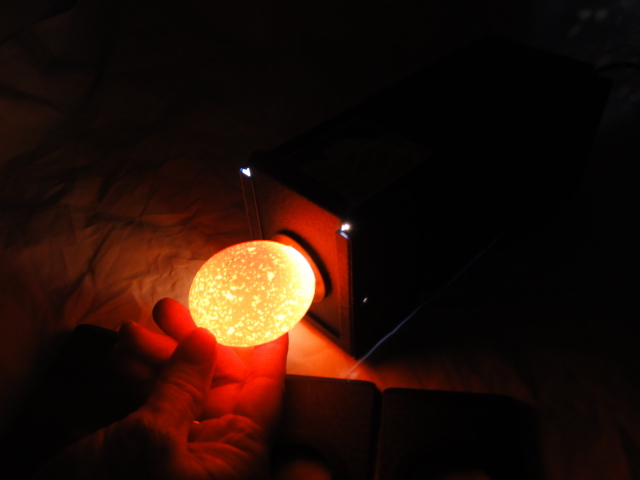
Incubation is often viewed as a mysterious process, at least in part because the growth process is occurring "behind closed doors" inside the egg shell. The ability to see, in part, the development of the chick in the egg helps us understand the growth process and helps improve our incubation results. The process of viewing the internal contents of the egg shell is called Egg Candling. This name came from the use of candles as a light source in the early days of incubation. Egg candling is a simple process. It involves using a light beam and allowing the light to penetrate the shell and illuminate the inside of the egg. Candlers vary for the simple wooden box as illustrated below, to the intermediate type of assembly with a light and pre-made box,torch style candler and benchtop style candler, to the sophisticated, light controlled, lens focused arrangements. For most of us, the simpler units are quite adequate.
What can be learned using a candler?
- The state of freshness of the egg
- The quality of the egg shell before setting.
- The level of development of the embryo during incubation.
- Early incubation failures, and infertile eggs.
- Moisture control in the incubator.
How To Candle:
Eggs are best candled in a darkened room so that the inside of the egg is better illuminated. Hold the large end of the egg against the light beam so that the light only comes through the egg. Now look sideways at the broad sides of the egg. Do not look towards the light through the narrow end of the egg. Rotate the egg so that all the contents may be viewed. See Figure 1.

Some very large eggs such as ostrich require different candling techniques, with much brighter light sources, while some, such as emu, are too dark and require infra red systems. Mottled eggs from quail and dark shell from some pheasants are also difficult to effectively candle.
- State of freshness of the egg. The size of the air cell at setting is very important. If the egg has dried more that its quota of moisture loss pre-hatch, then the chicks will be struggling to hatch at all. The illustration in Figure 2 demonstrates what the air cell looks like after different storage times. Please watch this this interesting Video on Chick Development, this is a simulation but gives you a good idea of what is happening. We also remind people of Candling on our Hatchabatch app.

2. State of the shell. Many disease including infectious bronchitis, can cause discoloration and some damage to the shell. When illuminated during candling, shell faults become apparent. Eggs with these faults should not be set, as they are known to have poor hatchability. Shell faults include mottling, hairline cracks and chalkiness. See Figure 3.
3. Development of the embryo. With the high powered, lens focussed candlers, the development of the embryo can be seen from 24 hours onwards. With the simple 'light in a box,' embryo developments are usually visible from about 3-4 days. By one week, the spidery blood vessels are very obvious. See Figure 5.

4. Early incubation failures, and infertile eggs.
- Eggs which are clear at one week are either infertile or have suffered early embryo mortality. Eggs that have a single "C" shaped blood vessel have died, possible due to low vitamin K and or jarring. Figure 4
- By the end of the second week, the egg will be a solid mass, with only the air cell open. The point of the small end may still be a little cloudy, as there should still be a little unabsorbed albumen at this stage. Movement of the embryo is easily seen at this stage, though lack of movement should not be taken as a sign that the embryo is dead.
- At 18 days, the chick is fully formed and is almost ready to hatch. If candled on the 19th and 20th days, the beak of the chick will be seen in the air cell. (Chicken eggs only).
5. Moisture control. During the incubation process the egg will lose an average of 13% of its weight as moisture loss. The limits of this loss are a minimum of 11%, and a maximum of 15% (chickens, ducks and geese.) Insufficient weight loss will mean wet and sticky chicks, with a possibly delayed hatch. Too much weight loss will result in small, noisy chicks, with increased post hatch mortality. Moisture loss of 13% will mean that around 30% of the egg volume will be air cell by the 18th day. By watching the development of the air cell and monitoring the weight we have an extremely accurate method of relating air cell growth, humidity readings in the incubator, and weight loss. See the Bellsouth Air Cell Development PDF. We also wrote and Article regarding humidity and incubation for Australasian Poultry magazine and there are reputable places which talk about this factor i.e pasreform. There is also another article on the resource page regarding humidity in Incubation, or downloadable Bellsouth Understanding Humidity in Incubation
Weighing is not essential but certainly helpful with difficult species, or where accurate information is not available about a certain species. An application of this is ostrich incubation.
When Is It Best To Candle?
We recommend that egg candling be done four times during the incubation process. The first time is prior to setting the eggs. This enables the observation of the freshness of the eggs, which relates to the storage conditions and the removal of any with faults. The second time is after one week. This will indicate the infertile or clear eggs, and will give the first humidity indication. The third candling is after two weeks. This will give a good idea of the continued development, and the critical moisture indicator. This is the last chance for humidity adjustment. The fourth time is at the transfer to hatcher or the last turn on the 18th day for chicken eggs. For other species, candle about three days before due hatch date. This candle will indicate that the humidity has been correct and that all is well. Usually by this time, the adjustment of the humidity will have little bearing on the end result. If the egg is too dry, then little can be done to help. If it is too wet then a couple of days at low humidity may correct the situation, but probably not. Humidity in the incubator for the last three days is usually set for maximum so as to avoid drying just as the chicks are hatching. This is mainly necessary in forced draught incubators.
The fourth candling is usually used to confirm the decisions made in earlier candlings. If the situation is incorrect, make notes so that you will be able to remember what to do next time. The main thing to remember about candling is that it is used to build an experience factor. Don't expect to understand all there is to know the first time. After you have done it a few times, you will be able to cross compare what you are seeing and have the ability to make adjustments because of it. After a little while, you will see the eggs that are different and be able to tell a good one from a dud. Another thing to consider is to always candle at the same time each batch. If you candle one lot on the 7th, one on the 5th, and one on the 8th, you are always looking at different stages, and the ability to see the pattern of growth is more difficult to discern. If you always do it on the same days, then you only have four stages to remember. Notes for Other Species The best time to candle any species is on a weekly basis. This will mean quail are only candled twice, and ostrich are candled five or six time. Routine is the important part, always candle on the same days to avoid confusion.
This article is also available on the Bellsouth Resources page, its downloadable there as well.
Feel free to share your comments on the Bellsouth Facebook Page.


-